
In one of my earlier post, I have discussed the marquee tools in Photoshop. Another important tool for selection is the lasso tool in Photoshop.
Lasso Tool in Photoshop
There are three types of Lasso tools. These are the Lasso tool, which is primary, next is the Polygonal Lasso tool, and finally, the Magnetic Lasso tool. With the help of these tools, you can easily select a part of an image.
Lasso Tool

This tool is helpful, when you need to select a person out, from a group of people or when you select an irregular shape out, from an image. For selecting a shape using this tool, you require a steady hand and good coordination between your eyes and hand. You also require a good mouse and mouse speed.
Selecting a shape
- Click on the tool. You can also press L on the keyboard to access this tool.
- Now, set the feather amount, if you wish the selection to blend into the background and check anti-alias box.
- You have three more selection options, other than the new selection, in the property box located on the top. These are Add to selection, Subtract from Selection and finally, the Intersect with Selection. These options are same, as was discussed, in the marquee tool.
- Click and start dragging the mouse, carefully selecting the portion of an image by dragging the tool around it. A solid line shows the selection.
- When you are close to the endpoint of the selection, the two ends automatically join together, to complete the selection. If accidentally or by mistake, you release the mouse button before, completing the selection, even then the lasso tool draws a straight line to connect the ends together. With the tool still selected, press the shift key or select Add to Selection from the property, and draw again to finish the selection.
- Similarly, if a part of your selection spills out, use Alt(Win)/Options (Mac) to Subtract from Selection.
The Polygonal Lasso Tool
This tool makes a geometric selection. It is rather easy than the lasso tool since it can be controlled more easily. You can make a detailed selection using this tool. Here, you click to place points on the image. This creates a straight line between the points.
Steps to use
Follow the given steps to create a selection using this tool.
- Select the tool or press L on the keyboard. If you happen to select lasso tool earlier, press Shift+L to select this tool.
- Click mouse to start making a selection. You can select by clicking closer or far. A straight line follows the last point clicked.
- Keep clicking carefully to select the portion, or area that you want to select.
- When you reach the start point, you will notice a small circle beneath the cursor.
- Double click on it to finish the selection.
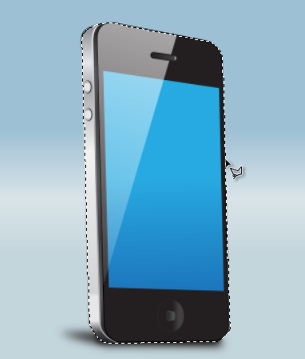
The Magnetic Lasso Tool
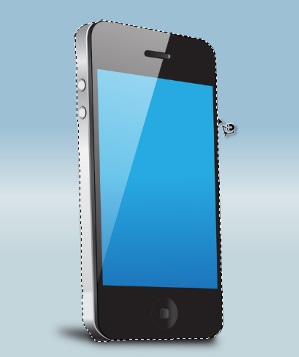
Finally, the Magnetic Lasso tool. The easiest and most used tool, for selecting a part or area in an image. It automatically finds the edge by looking for differences in the color contrast. Because it snaps to the edge, it creates a well-defined edge, as you drag the mouse around a shape.
You can choose any option from options bar located on top. These are New Selection, Add to Selection, Subtract from Selection, Intersect with Selection, feather and, anti-alias.
Width determines how close the lasso tool should be, to the edge, to recognize it. Enter the width value in pixels. To increase the edge width by 1 pixel, press the right bracket (]) key, while to decrease the value by 1 pixel, press the left bracket ([) key on the keyboard.
Contrast – Set the parameter or value for edge contrast, so that, the tool recognizes the difference between the brightness or contrast of different pixels and makes the selection accordingly. The contrast value is between 1% and 100%.
Frequency refers to the points at which the tools set its points. Enter a value between 1 and 100.
Use Stylus pressure when you are working on a tablet. It decreases the edge width while increasing the stylus pressure.
Selecting with Magnetic Lasso tool
- Select the tool. The cursor is changed to the tool icon. Set the values of width, contrast and, the frequency that you need for selection.
- Place cursor on the edge of the area in the image, that you want to select.
- Click the mouse and start dragging it around the edge.
- Notice the small zero attached to the tool icon. It indicates that the mouse is close to the start point. Click to finish selection.


Vaibhav says:
Vaibhav says:
Vaibhav says: