
Selection is a portion of an image that you select by using the tools provided in Adobe Photoshop. Photoshop allows using multiple selection modes available in it that helps you in making a probable selection in an image. Most noteworthy, you can edit an image by selection, using the different selection modes in Photoshop and then work on them. These selection modes are Marquee tools, Lasso tools, Quick selection tool and Magic wand. Because of the reason that you need to make different selections in a particular way hence, different kind of tools is provided in Photoshop. This topic is about discussing the marquee tools in depth which are especially relevant while using Photoshop.
Marquee tools in Photoshop
Marquee, as the name suggests, is a selection which appears like ants marching in a straight line, or say, the lights blinking. To use marquee tool, you have to create a new document. First of all, let us understand the types of Marquee tools.
Marquee tools (M) have four types, namely:
- Rectangular marquee tool
- Elliptical marquee tool
- Single row marquee tool and
- Single column marquee tool
It is located in the upper-left corner of the toolbox. Letter “M” on the keyboard helps in availing the shortcut for marquee tool. Marquee tool offers you two options. The first option of Marquee tool is that it helps in selecting a portion of an image and in addition, it allows you to draw an object using the rectangular and elliptical marquees.
Rectangular Marquee Tool
Click on the rectangular marquee tool or press M on the keyboard. As a result, the cursor changes into a crosshair. Now, on the canvas, click the mouse button and drag it to make a selection. As a result, you can make a rectangular selection.
Elliptical Marquee Tool
The Elliptical Marquee tool works in just the same way as the rectangular marquee tool. And, it is also known as Oval marquee tool. The selection results in elliptical or oval in shape. Click on or off anti-alias for elliptical marquee tool.
Note: To toggle between the rectangular and elliptical marquee tools press Shift+M keys (Win) and Option+M (Mac)on the keyboard.
Single Row Marquee Tool
A single row marquee or a thin horizontal marquee select a single row of pixels, i.e., 1-pixel.
Single Column Marquee Tool
A single column marquee or thin vertical marquee select a single column of pixels or to say 1-pixel.
Use the single row and column marquee tool to clean up the edges of an object.
Options in Marquee tool
Selection options
In addition to the above discussion, you can also add to selection, subtract from the current selection or intersect the selection by using the options given in Photoshop.
First of all, let’s take the Add to selection option. Click on this option to select, after you have made your first selection then click the mouse button and drag to make an additional selection. The shortcut key to this option is by pressing the Shift key (Win) on the keyboard and then clicking the mouse button and dragging.
Notice the plus sign beneath the crosshair.
The second option is Subtract from selection option. Subtract the selection from the current selection. Using the Alt key (Win) and Option (Mac), press and drag the mouse to subtract. You will see the minus sign just below the crosshair.
Another option, the third and the final, in the marquee tool, is the Intersect with selection option. As its name suggests, it makes a new selection by the intersection of the two selections. In addition, you can use the Shift+Alt keys (Win) and Shift+Option keys (Mac) on the keyboard to make a new intersection.
Feather
Furthermore, another option available in Photoshop is the Feather option. Feather option helps to make a fuzzy, feathered edge selection. It results in a blur selection of an object that blends into the background. Enter a value in pixels to apply feather in a selection.
Style
The three styles are Normal, Fixed Ratio and Fixed Size. Apply any one of the style options.
In Normal style, results in making a selection dimensions according to your need.
Fixed Ratio style concludes in by giving you the option to make a selection in ratio. As a result, you can set the width to height ratio.
The Fixed Size style offers you to set the width and height values of marquee selection in pixels. After entering the values, click on the canvas to make a selection.
Select And Mask
Select and mask is used to create or refine a selection. Click on the select and mask… button to open the editing mode. You will find a toolbar on the left side. First, take quick selection tool (W). Adjust the brush size, hardness, spacing, angle, rotation, size- off, stylus wheel and pen pressure according to your need. You can make a new selection in your image. In the options bar located on the top, click on Add to selection to add a new selection to the current selection. To remove a part of the selection, select Subtract from selection, then press and drag the mouse in the image.
The next option provided is the Refine edge brush tool (R). Here also, you can adjust the brush size, hardness, spacing, angle, rotation, size- off, stylus wheel and pen pressure. The other two options given are Expands detection area and Restores original edge.
The third option is the Brush Tool (B). You can Add to selection or Subtract from selection, using these options.
In addition, you can use the Lasso tool (L)and Polygonal lasso tool (L) to select an area in an image. With the Lasso tool, you can draw freehand selection. Polygonal lasso tool makes a selection in a straight line, or say, it draws geometric selection. Use Add to selection, Subtract from selection and Intersect with selection options to edit the selection.
Use Hand tool (H) to navigate from one area to another after zooming in, in the image by dragging around.
Magnify the image using the Zoom tool (Z).
Properties
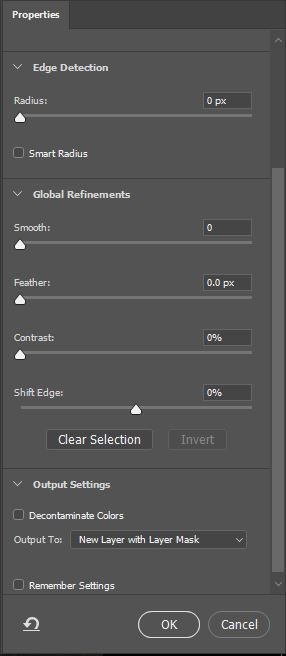
Another most noteworthy is the Properties of the Select and Mask. Here, in Edge detection adjust radius, click on or tick off smart radius. Global refinements have Smooth, Feather, Contrast and Shift edge. You can adjust these by sliding the bar level until you are satisfied with the result. Click on Clear selection button to remove the selection. Click on the Invert button to inverse the selection made on the image.
Finally, the output settings. In it, you will find the Decontaminate colors option. Tick on or off it. When you tick on this option, the Output to makes available the New Layer, New Layer with Layer Mask, New Document and lastly, new Document with Layer Mask. Next, is the Output to option. Whereas, with Decontaminate colors option ticked off, all the options in Output to, are available.
Conclusion
These various options, in marquee tool, let you make a selection. You can also select exactly the portion that, you want to retain while removing the unwanted portion of an image. On the other hand, you can also make a drawing, and be coloring it using different layers. Thus, we can say that the marquee tool is an especially relevant tool in Photoshop.


Vaibhav says:
Vaibhav says:
Vaibhav says: